API Docs for Fast, Secure Document Signing
Integrate templates, signer routing, and webhook automation in your app with a simple REST flow. Built for developers who want quick setup and reliable delivery.
First Request Example
cURL / HTTPPOST https://api.indigoesign.com/api/v1/sign-request
Authorization: Bearer sk_live_xxxxxxxx
Content-Type: application/json
{
"template_id": "tpl_123",
"title": "Offer Letter",
"signers": [
{
"role": "client",
"email": "john@example.com"
}
],
"redirect_url": "https://yourapp.com/success",
"webhook_url": "https://yourapp.com/webhook"
}
Why Teams Use This API
Clean endpoint design, predictable behavior, and template-first workflows.
Simple REST Integration
No SDK required. Use standard HTTPS calls from any backend.
Template-Based Sending
Create templates in panel, then reuse them by `template_id` in API calls.
Real-Time Webhooks
Track `request.sent`, `viewed`, `signed`, and `completed` instantly.
Getting Started
Follow these steps to prepare your account for API integration.
1 Authentication & API Keys
Accessing the API requires a Secret Key. You must have an active account to generate keys.
- Sign Up / Login: If you haven't already, create an account or log in to your dashboard.
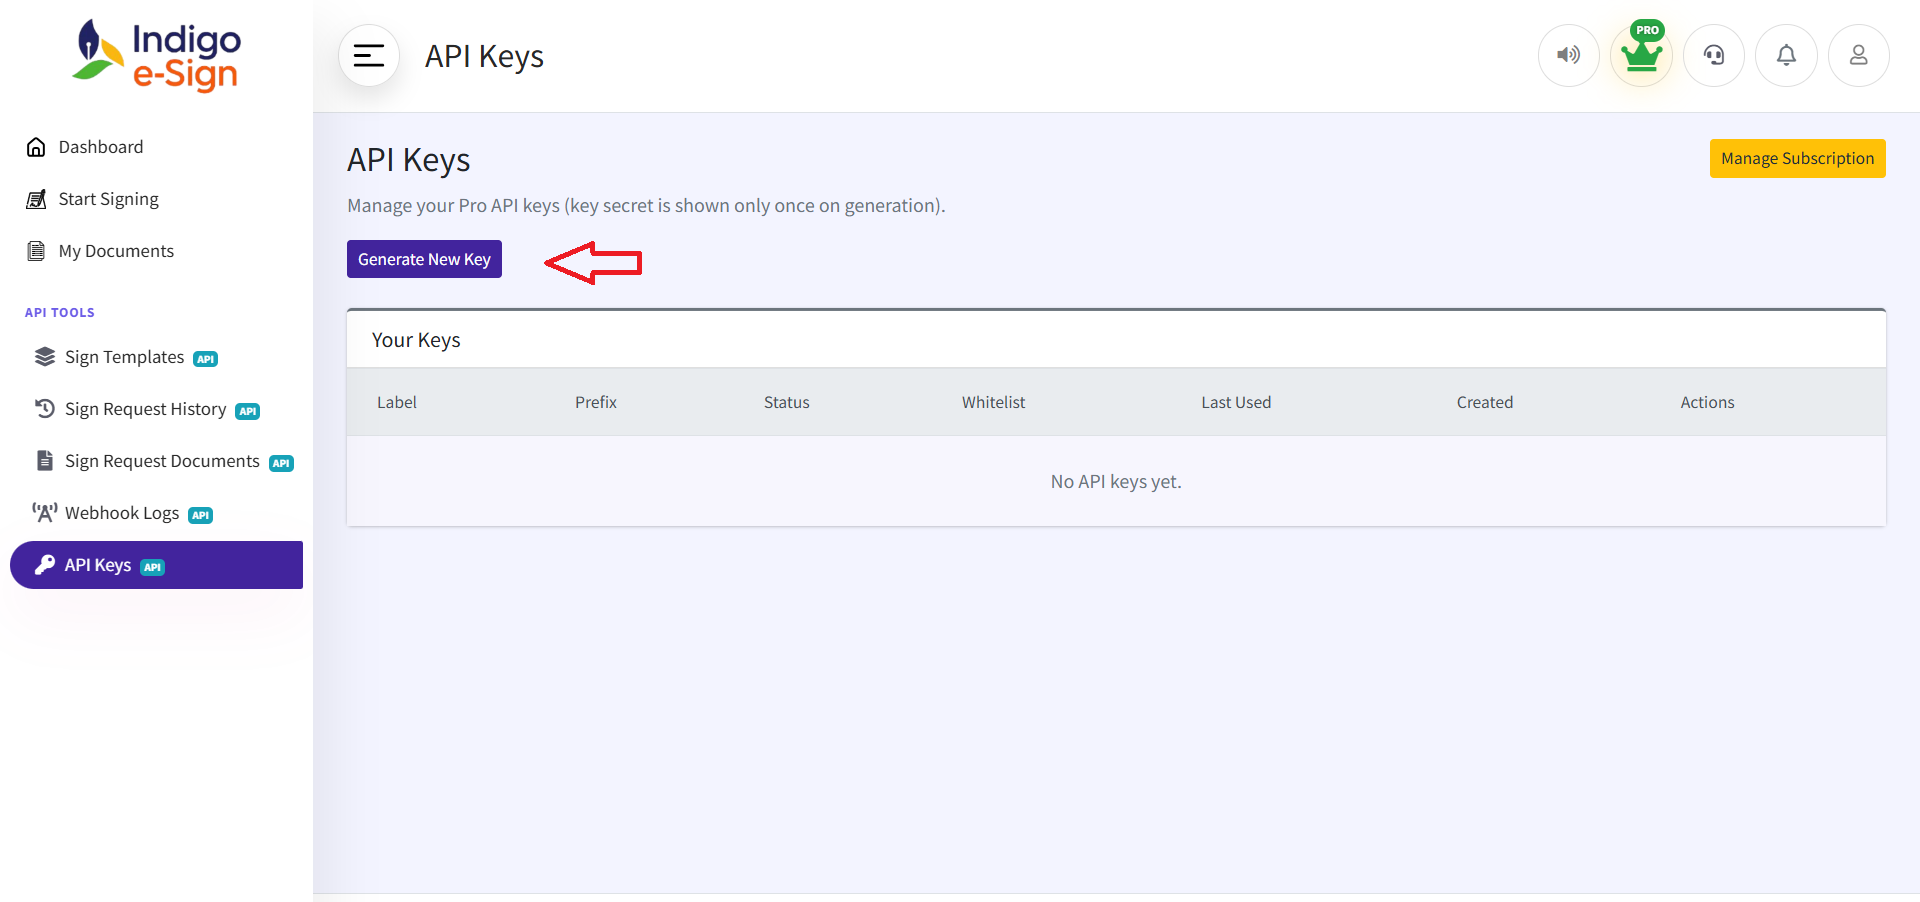
- Navigate to API Keys: From the sidebar menu, click on "API Keys". This is located under your profile settings or developer tools.
- Generate Key: Click the Generate New Key button.
- Save Secret: Copy the secret key immediately. For security, it will only be shown to you once.
2 Preparing Sign Templates
The API works by referencing pre-configured templates. This allows you to design the document layout once and reuse it programmatically.
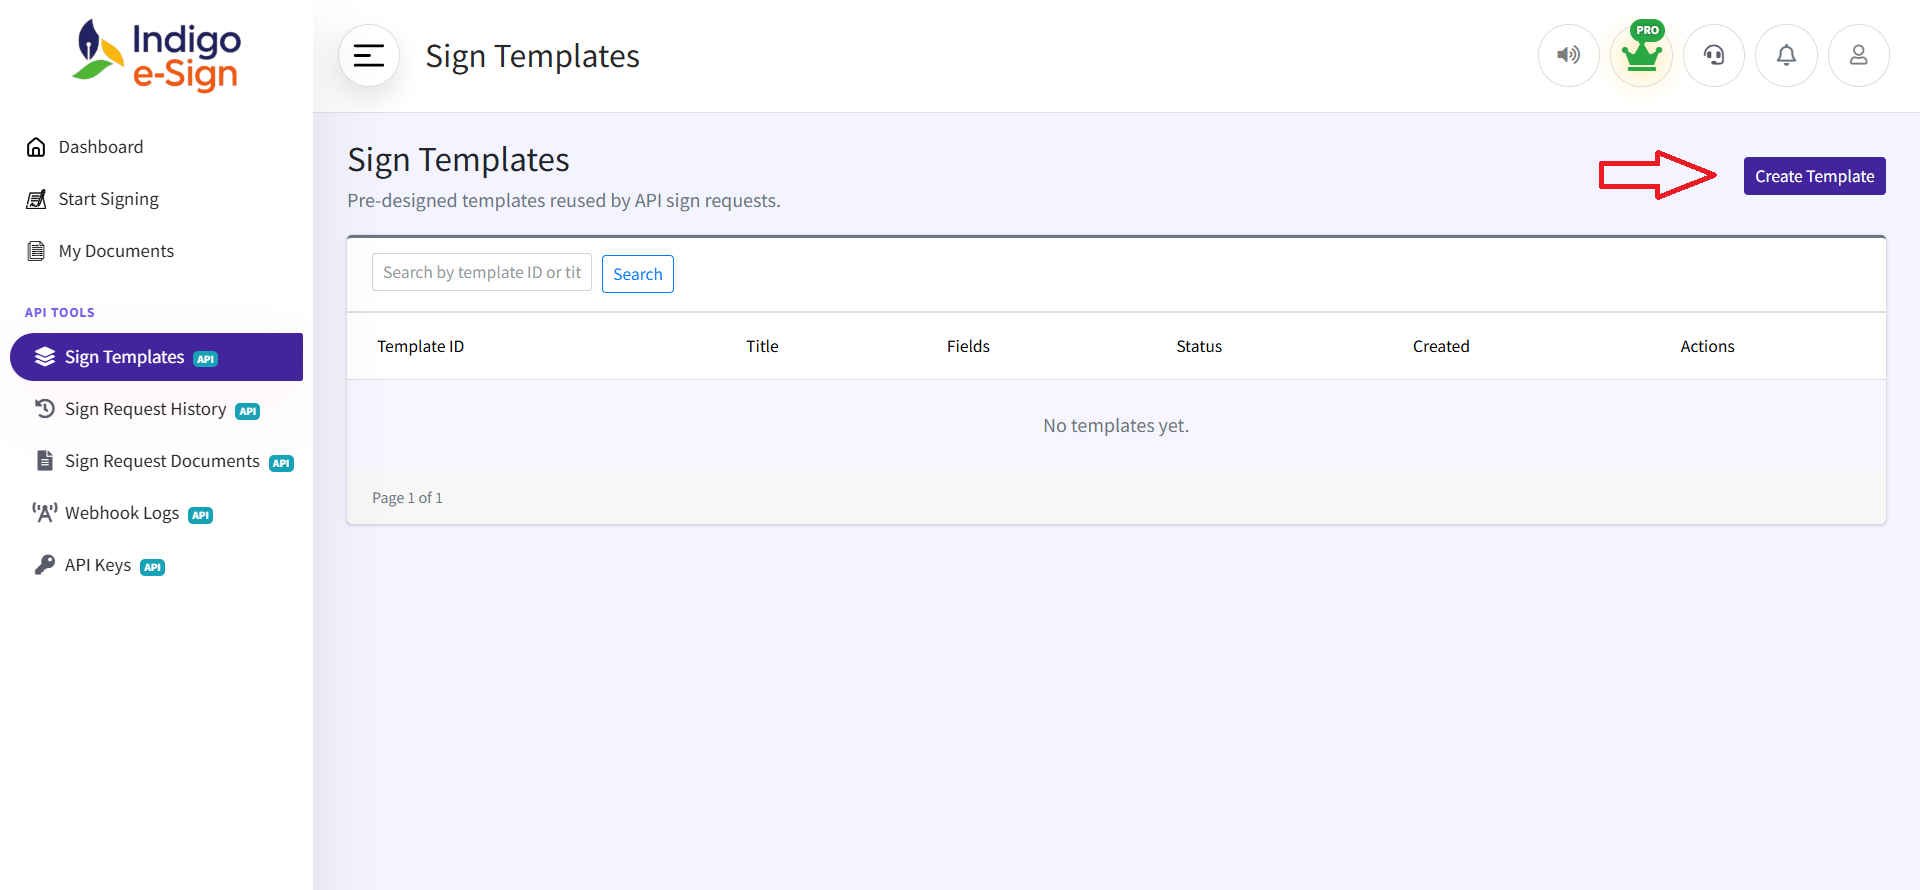
- Access Templates: Go to the "Sign Templates" section in your dashboard sidebar.
- Create New: Click "Create Template" and upload your base PDF document.
- Configure Fields: Use the drag-and-drop editor to place signature, text, and date fields. Each field should be assigned to a specific Role (e.g., "Client", "Manager").
- Save & Activate: Once finished, save the template to make it available for API requests.
3 Locating the Template ID
Once your template is created, you'll need its unique identifier for your code.
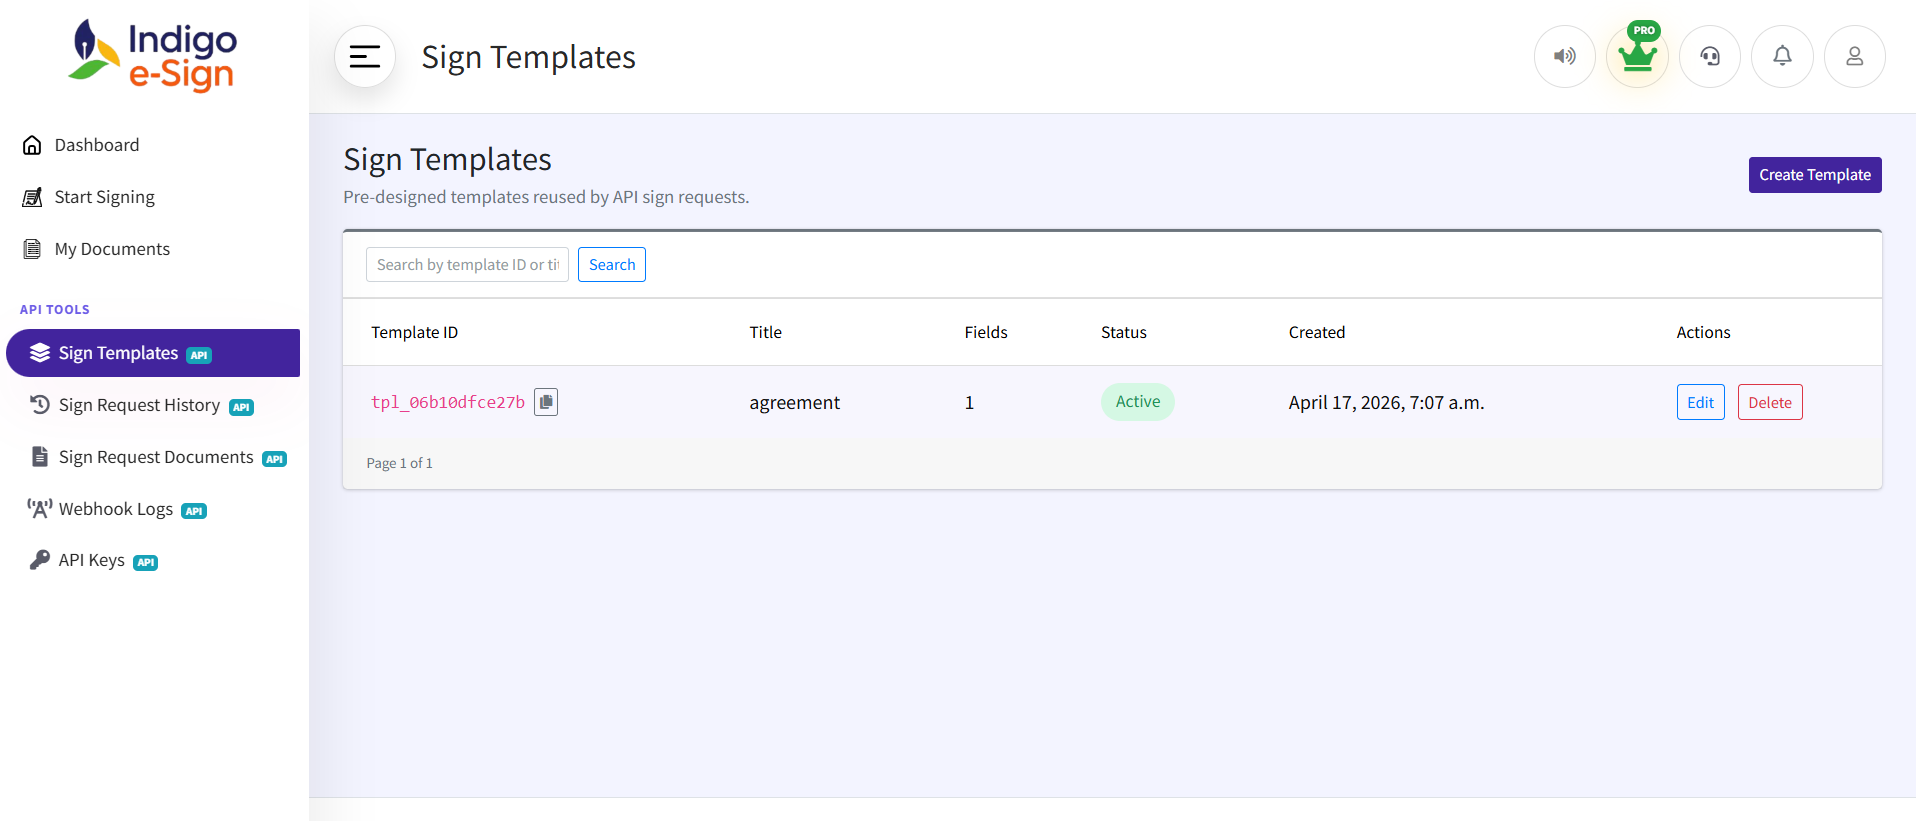
- Find the ID: In the Sign Templates list, each template has a
template
ID (e.g.,
tpl_x8k2j9...). - Copy Utility: Use the copy icon next to the template ID to instantly copy it to your clipboard.
- Verify Roles: Ensure the roles you use in your API call
(
"role": "client") exactly match the roles defined in your template's fields.
Go Live in 3 Steps
Generate API Key
Create a key from your panel and use it in Bearer auth header.
Create Request
Call `POST /api/v1/sign-request` with template ID + signer list.
Handle Webhooks
Update your product logic when signing events are delivered.
API Reference
Use this endpoint to create sign requests from saved templates.
Main Endpoint REST
Headers
Authorization: Bearer sk_live_xxxxxx
      Content-Type: application/json
Request Body
{
        "template_id": "tpl_123",
        "title": "Offer Letter",
        "signers": [
          {
            "role": "client",
            "email": "john@example.com"
          }
        ],
        "redirect_url": "https://yourapp.com/success",
        "webhook_url": "https://yourapp.com/webhook"
      }
Request Parameters
| Field | Type | Required | Description |
|---|---|---|---|
| template_id | string | Yes | Template created via panel |
| title | string | Yes | Request name |
| signers | array | Yes | List of signers |
| signers[].role | string | Yes | Signer role (e.g. client, vendor) |
| signers[].email | string | Yes | Signer email |
| redirect_url | string | No | After signing redirect |
| webhook_url | string | No | Override webhook |
Success Response (200) JSON
{
        "request_id": "req_abc123",
        "status": "sent",
        "signers": [
          {
            "role": "client",
            "email": "john@example.com",
            "signing_url": "https://app.com/sign/secure_token"
          }
        ]
      }
Error Responses JSON
{
        "error": "Invalid API key"
      }
{
        "error": "API access not allowed in your plan"
      }
{
        "error": "Your plan allows only 1 signer"
      }
{
        "error": "Invalid template_id"
      }
Quick Start in 60 Seconds
Copy and run your first signing request
cURL
curl -X POST https://api.indigoesign.com/api/v1/sign-request \
-H "Authorization: Bearer sk_live_xxxxxxxx" \
-H "Content-Type: application/json" \
-d '{
"template_id": "tpl_your_template_id",
"title": "Employment Contract",
"signers": [
{
"role": "client",
"email": "client@example.com"
}
],
"redirect_url": "https://yourapp.com/success",
"webhook_url": "https://yourapp.com/webhook"
}'
Python (requests)
import requests
url = "https://api.indigoesign.com/api/v1/sign-request"
headers = {
"Authorization": "Bearer sk_live_xxxxxxxx",
"Content-Type": "application/json"
}
payload = {
"template_id": "tpl_your_template_id",
"title": "Offer Letter",
"signers": [
{"role": "client", "email": "john@example.com"}
],
"redirect_url": "https://yourapp.com/success",
"webhook_url": "https://yourapp.com/webhook"
}
response = requests.post(url, headers=headers, json=payload)
print(response.json())
JavaScript (Node.js / Fetch)
const response = await fetch("https://api.indigoesign.com/api/v1/sign-request", {
method: "POST",
headers: {
"Authorization": "Bearer sk_live_xxxxxxxx",
"Content-Type": "application/json"
},
body: JSON.stringify({
template_id: "tpl_your_template_id",
title: "Agreement",
signers: [
{ role: "client", email: "client@company.com" }
],
redirect_url: "https://yourapp.com/success",
webhook_url: "https://yourapp.com/webhook"
})
});
const data = await response.json();
console.log(data);
Webhook Events
Event occurs -> send webhook -> log result.
| Event | Description |
|---|---|
| request.sent | Request created |
| request.viewed | Signer opened link |
| request.signed | One signer completed |
| request.completed | All signers done |
Client endpoint: POST https://client.com/webhook
Retry + Security
- Retry 2-3 times on webhook failure
- Log every failed attempt
- Use header:
X-Signature: sha256=xxxxx - Verify payload authenticity on client side
Ready to Build with the Sign Request API?
Generate an API key, create a template, and send your first request in minutes.
Generate API Key